All fired up


Today was an exciting day as a giant box arrived from Amazon containing my new garden incinerator. It’s basically a metal dustbin with holes in to let the air circulate and three metal legs which you screw on. I was at the allotment within the hour, equipped with matches, a pile of bank statements and Christmas wrapping paper to start the fire with, plus emergency firelighters.

I put some screwed up bank statements and wrapping paper at the bottom of the incinerator, then a pile of small dry twigs then lit it using a bank statement as a kind of taper. I did use a firelighter as well and it got going really quickly. It was loads easier than lighting a bonfire in the disused cold frame which I tried a few weeks ago with very little success. I added more, bigger pieces of dry wood to the fire then, when it was good and hot, added some dried bindweed (which went up with huge flames) and started putting on the driest of the piles of brambles and weeds.

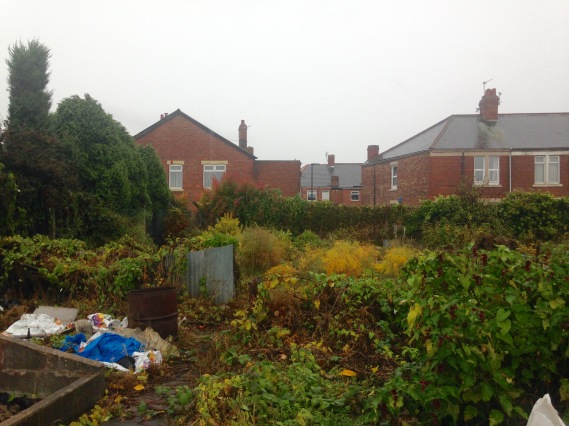
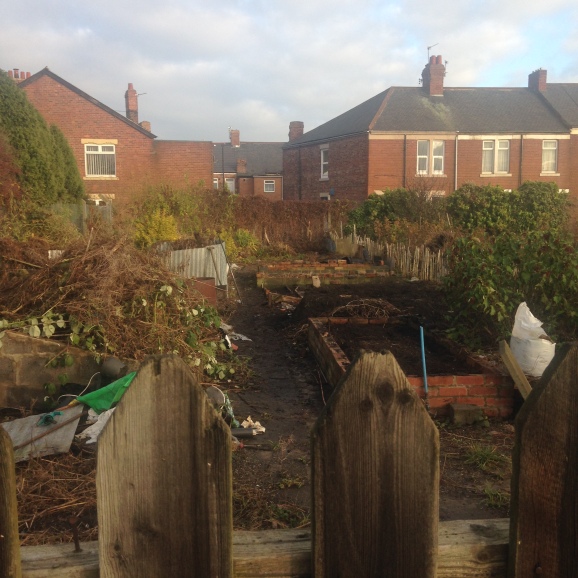
There were points when the allotment and incinerator disappeared in clouds of smoke but on the whole it was a very successful burning session and a huge mountain of weeds was reduced to smouldering ash. I reckon about five more fires like today and I should have got rid of nearly all the piles of weeds I’ve accumulated.

I spotted the little wren which must live on or near my plot today as well, but he was too speedy for me to photograph. Next time hopefully.

I’ll be back at the plot tomorrow to spread the ash and probably do another fire while the weather’s not too frosty.

First ventures into composting

As I have three  old plastic bins / containers on the allotment, plus a huge amount of cut vegetation to dispose of, I decided to look into composting. It looks as though some of the stuff I’ve cut down and piled up to burn at a later date has already started composting itself already so I took that as a good sign.

I know you shouldn’t compost perennial weeds like bindweed, which I have a lot of, but I figured it might be a good way of getting rid of some of the reed-like plants, nettles and other miscellaneous things I’m chopping down and digging up.

After filling the bin with a mixture of green reeds, dead brown ones, nettles and privet cuttings, I’d got rid of a tiny fraction of the piles of waste but I know it should shrink as it rots down so hopefully I can add more. Once the bin was fill I put a sheet of plastic weighted down with bricks on top to keep the rain out. I haven’t drilled any holes for ventilation but am planning to turn it every couple of weeks so we’ll see how it goes.

I’m planning to order an incinerator over Christmas so am looking forward to lots and lots of fires in the new year to help get rid of all the brambles and bindweed that I can’t compost. Any tips on the best incinerator to get or how to burn a vast amount of weeds are very welcome!


Using up the last of the home-grown tomatoes

Obviously the allotment’s not ready to grow anything in yet, but I’ve been trying to grow various veg in pots and containers in my front yard for the past couple of years. Most successful has been broccoli (a couple of years ago) and this year, tomatoes were a surprise success.

Just before it got frosty, I picked all the remaining tomatoes. There were absolutely loads, but hardly any of them had ripened so I ripened them indoors by putting them in a paper bag with a banana which worked really well.

img_0483


img_0575


Today I used up the very last of the harvest, and I ate the few tiny remaining tomatoes on bruschetta with a bit of goats’ cheese. It’s a bit sad that there will be no more home-grown veg for a few months at least, but I have uncovered some horseradish growing on the allotment which I’ll try digging up for some horseradish mash soon.

Home grown tomato bruschetta

Before and after: allotment progress so far

I’ve reached an annoying stage of the allotment clearing where progress doesn’t seem as fast as it was when I started. There’s a huge pile of weeds to burn and rubbish to either put in a skip or cart to the dump, and it doesn’t feel like things will start to look at lot better any time soon.

So to cheer me up, here’s a before and after of the progress so far.

Here’s the plot when I started.

img_0509

Overgrown allotment before clearing started

And here it is three weeks and nine visits later. Each visit’s been between an hour and three hours in length, so no full days and just a small amount of progress at a time.

img_0682

Allotment after three weeks’ work


Not only is it sunnier in the second photo but it does look loads better. You can see raised beds, there’s no abandoned mattress any more and the pathways are nearly clear. Next tasks are burning the bindweed roots and digging over the beds again to get rid of any that are left. I also want to plant some garlic before Christmas and see how it does against the weeds that are bound to reappear in the spring.